I enjoy writing these articles for my readers, you guys. I don't accept payment for writing reviews, my opinion on products is my own, but if you find my recommendations helpful and you end up buying something through one of the links I may be able to receive a commission on that. More information
Hockey is a sport that we pass on to our children, and which we Dutch are very good at, especially the ladies at World Cups.
But no match can be played flawlessly without a good umpire who makes sure that the rules are properly followed and both teams have an equal chance of winning.
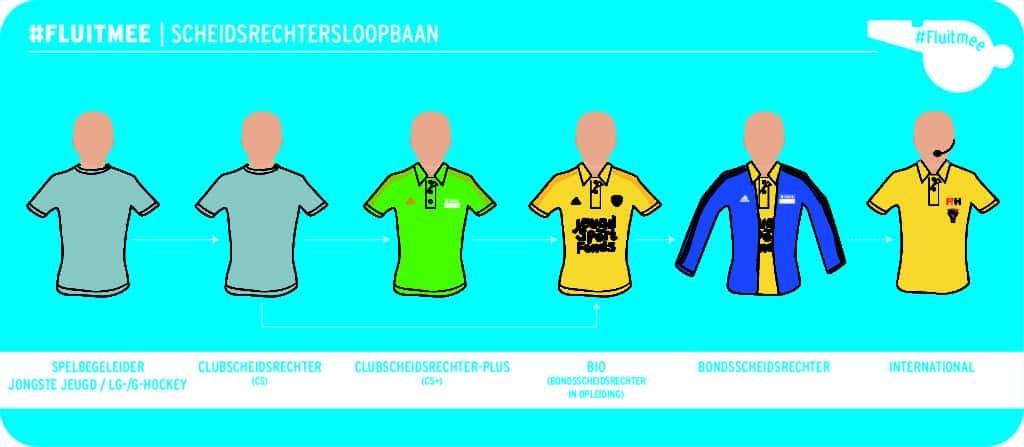
The career of a referee almost always starts at your own club. If you have always enjoyed guiding the youngest players, then a start in the refereeing process might be something for you.
Here's how.
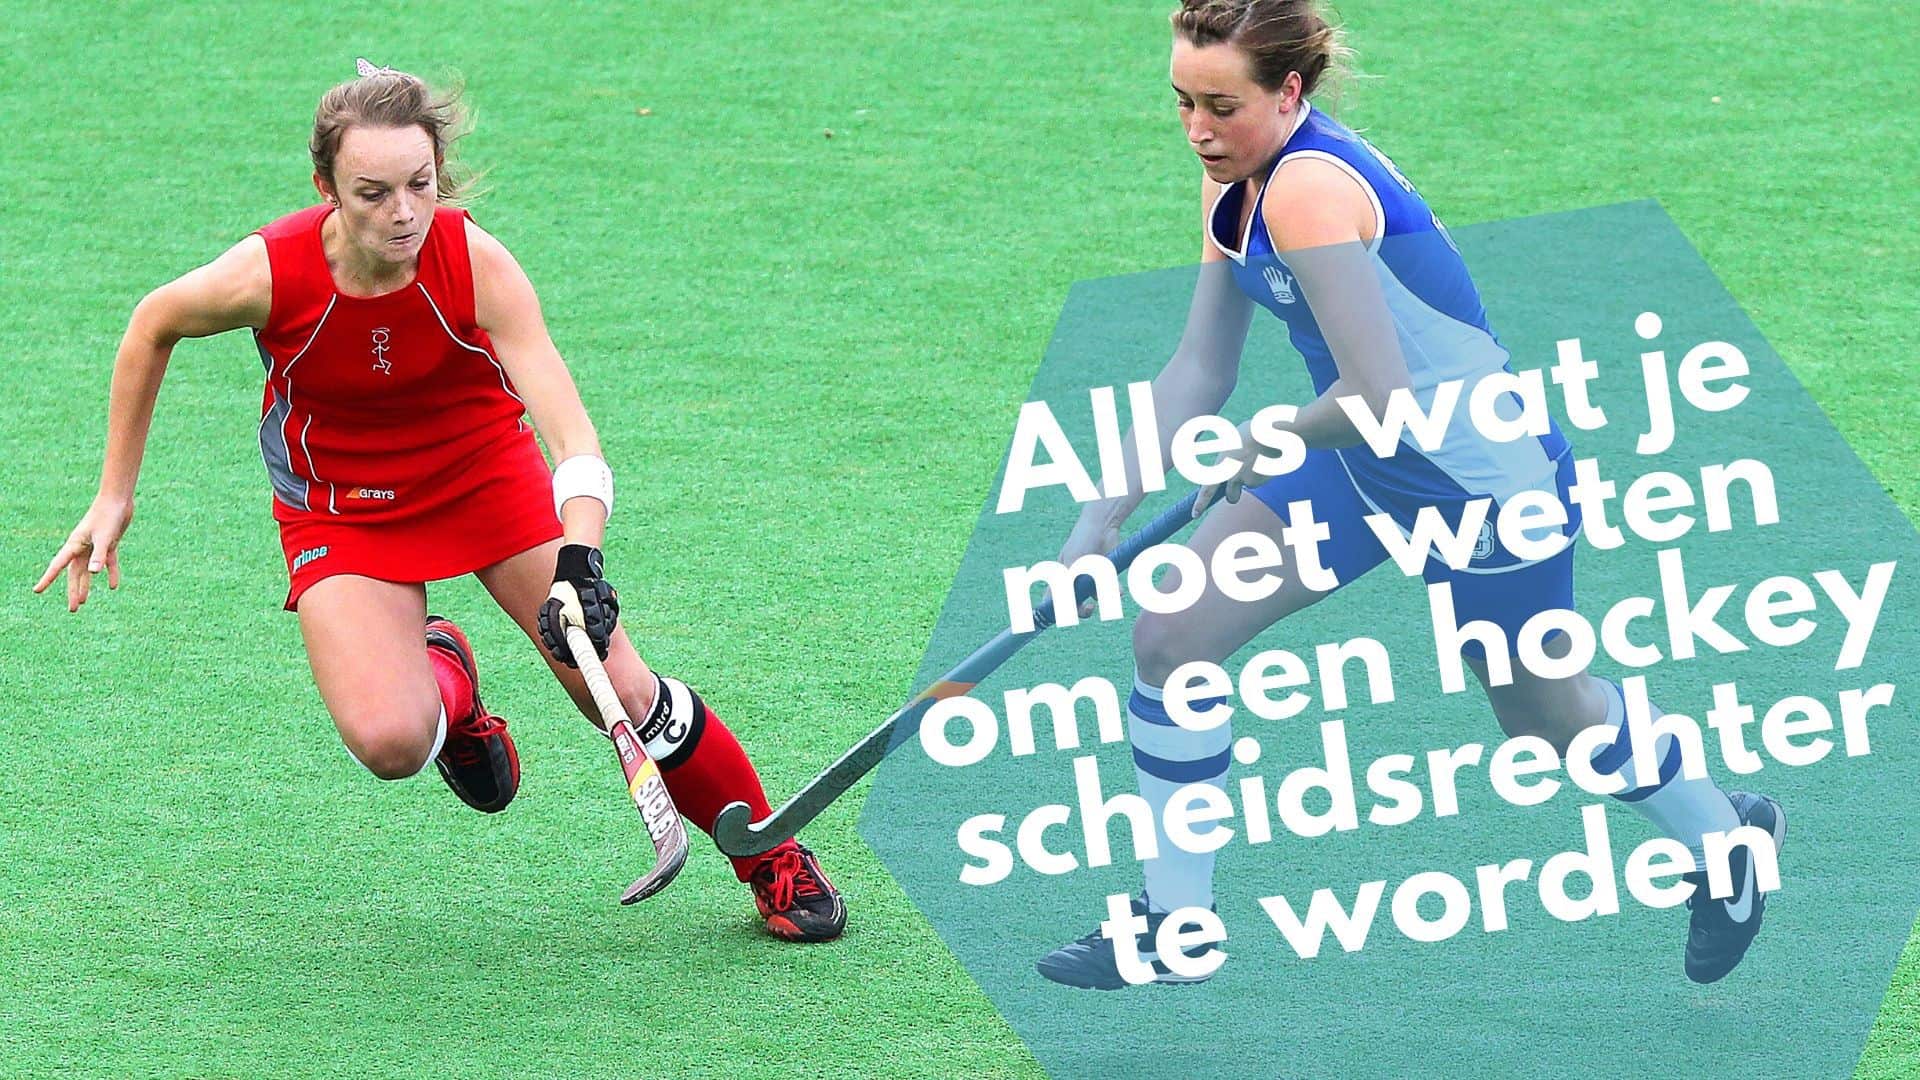
The referee is the most important element for a good game.
What we discuss in this comprehensive post:
How can I become a referee at hockey games?
De KNHB strongly encourages as many people as possible to get their cards. You need the card to be allowed to whistle matches.
To become a hockey club umpire, do the following:
- sign up with the referee commissioner of your club
- follow the e-learning of the KNHB
- follow the workshop “rules of the game” at your club or, if it is too small, at a larger club nearby
- follow the workshop "competition preparation course" at your club or an association in the area
- do a mock exam
- pass your theory test
- report to the referee committee of your association for the whistle of your first matches
The club referee whistles all matches that do not have to be whistled by the federal referee. The referee committee (which each club has) determines together with you which matches you are suitable for.
So you will probably start from the bottom. When you show up, you can move up to the more prominent matches.
(Source: KNHB.nl)
Each club has agreed that a certified arbiter will supervise the proper conduct of the game at every match. That's a lot of matches. There is therefore also a great need for trained referees who have obtained their card.
Is there a minimum age to become a referee?
No, there is no minimum age. It is mainly about commitment and dedication, and getting your card. You start at your club by getting your card at 14, and then you also whistle a few games to get to grips with the rules. Of course you don't have to persevere afterwards to become a real referee.
The most important thing is to take it all in and especially to practice. You can grow as a referee if you put everything into practice, practice and show your qualities.
How can I best practice?
Of course, as you progress, you will receive personal guidance. I will come back to this later in this article – with the process of becoming a federal referee. But the best way to practice is to do it.
To move forward you have to be vulnerable. Knowing your weaknesses can help you improve. And my best advice is to ask some people after the game what they thought of your flute skills.
These could be players, for example whether they understood you well and whether you have been loud and clear. But you can also ask for feedback from parents, coaches and other attendees with perhaps more experience. Also ask your fellow referee. That's the way to learn.
What is the salary you can expect as a hockey referee?
Money shouldn't be your main goal. You will not receive any compensation, especially in the amateur game. In that case, a referee will only receive a travel allowance, so that you do not lose out in any case.
Above all, you have to do it with your heart: heart for the sport and especially for your association!
Even the federal referee earns almost nothing. Sometimes it is a fee of a few tens of euros per whistled match. You can't quit your job yet for a career in whistling, unfortunately.
Also read: where can I buy my hockey gear with Afterpay
How do I become a federal referee?
The next step after club umpire is to become a federal umpire. But you will first have to take an exam, namely the exam of club referee + (CS+).
The steps to becoming a federal umpire are as follows:
- get your club referee card
- then take the CS+ exam (not mandatory but a handy intermediate step)
- whistle first-line matches from now on and make sure you stand out
- Sign up at the KNHB for the federal referee trajectory
- be judged at matches and whistle at federation matches in your district
- finish the workshops
- be appointed a federal umpire by the committee in your district
In order to progress in your education, you will first have to take the CS+ exam. When you have completed these, you can also whistle at the first-line matches, of course always in consultation with your club.
The CS+ is almost always given locally at your club. If they do not offer it, the local referee commissioner can point you to another association in the area where you can start the process.
Now that you have come a bit further, a little more is expected of you in the training. After your registration you will start with three workshops:
- an introduction to the training;
- more about the technique of where to stand and which signals you can use;
- more extensive session about the rules of the game and their application.
You will also have to show your knowledge and skills:
- show what you can do in practice to a learning coach who is made available. This gives you personal guidance and development tips for a number of competitions;
- complete the training with a practical test.
After completing this practical test, you can choose to whistle for a while as CS+ at more prominent club competitions, or you can move on straight away and register as a BIO (federal referee in training). This way you can make progress in obtaining your referee diploma.
When you register, it will first be assessed whether you are suitable. Here's what they're looking at you for:
- physical condition
- how do you whistle
- game rules
So you will have to prove yourself first!
After you pass the first assessment, a fun and extensive training program follows. Very hands-on and on the job. In addition to the workshop, you will be helped further while you whistle at federation matches. Personal guidance is central to this.
You also write reflection reports of your whistled matches and discuss these with your coach. In this way you learn more and more about yourself and about which qualities you can still develop.
At the end you will have to take both a theory exam and a practical exam (aptitude test) to show all your learned knowledge. Everything completed successfully? Then you can be designated as a federal referee in your district.
The rules of field hockey: explanation and tips
To explain all the rules of the game here might go a bit far, especially given the fact that the KNHB already has a lot of information about these rules on her site. There are a number of specific issues that I would like to discuss here, in particular practical explanations and tips.
Let yourself be heard and seen clearly
The most important tip is to whistle loud and clear. This way you come across as confident and everyone will know that something is going on, but being physically present in a confident way is also very important.
- You can support the whistle with clear directions with your arms.
- Do this by stretching them horizontally, only if you stretch your arms at an angle.
- Make yourself as big as possible.
- Indicate a free hit with your right arm when it is in front of the attacker and with your left in front of the defender.
- Always keep your back to the sideline. This way you keep your attitude open to the situation on the field and at the same time ensure that you have to turn your head as little as possible to continue to follow the game.
What are the signals and gestures for a hockey referee?
In hockey there are a lot of signals, gestures to immediately let you know what is going on. These signals are essential for the players to know where they stand. In addition, they are also very useful to let your colleagues know and notice what you have signaled in the game.
Paying close attention to what happens in the game is of course a must, but at the same time it is important to make yourself visible with gestures. And then also check whether your colleagues have also seen what you have indicated. You do this by using your body as best you can.
Here's an overview of the signals you'll use most during a match:

- Starting time: Look at the other umpire with one of your arms pointing straight up. Wait for the signal to be confirmed and then whistle to start the time.
- Stopping time: Whistle directly and raise both hands, crossed at the wrist. Also contact your fellow referee here.
- Remaining time: here use one arm with finger in the air to indicate 1 minute remaining, or use both to indicate 2 minutes.
- stock up: indicate the direction with a horizontally extended arm while standing on the sideline. Your arm is parallel to the sideline.
- Knock out: while standing with your back to the back line, extend both arms horizontally from your body. Here too parallel, but then at the back line.
- Handing out a long corner: The long corner is taken from the 23-meter line. Use your right arm to point to the corner flag where the ball closest went over the back line and use that arm to point in a sweeping motion to the correct spot on the 23-yard line.
- bully: here you imitate the movement of the hockey sticks with a bully with your hands. Hold your hands in front of your waist with the palms facing in.
- Acknowledge the goal: Use both arms to point straight ahead towards the center of the field.
- Reporting misconduct: Here you stop the game. Hold both hands in front of your body, palms down, and gently move them up and down.
- Award freestyle: Use your arm to indicate the direction of the freestyle while also standing parallel to the sideline.
- Applying the advantage rule: Hold your arm up at your sides in the direction of the team getting the advantage.
- Take or keep your distance: Stretch your arm straight out, keeping your hand fully open and your fingers apart.
- Award a penalty corner: Use both arms and stretch them horizontally forward towards the target.
- Award Penalty Ball: Use one arm to point to the penalty shot dot and raise the other straight up.
- Obstruction: Cross your arms against your chest.
- Indirectly hold off: Keep your arms crossed at your chest here as well, but move them back and forth at the same time.
- Propelling with foot or leg: Lift your leg by grabbing your ankle with your hand and use your other arm outstretched to point.
- indicate convex side: Move the palm of one hand over the knuckles of the other.
- hitting stick: move your arms diagonally in front of your body so that you imitate the movements when hitting the stick.
- Sticks: Rotate your arm up at a 90° angle next to your body and use your hand to make a circular motion.
- Dangerous game: cross one of your arms over your chest with a clenched fist.
- hold off stick: Hold one arm down at an angle in front of your body while touching your forearm with the other, approximately level with your referee's watch.
These are some of the most important gestures you will need when whistling a match. Below are a few more tips in specific game situations.
What are the rules for a penalty corner?
A penalty corner is awarded when a defender within the circle commits a foul. You can also award one outside the circle (but within the 23 meter area), but for a serious or intentional violation.
Incidentally, a serious or intentional violation within the circle usually results in a penalty shot. This also applies to a violation with the sole reason to prevent a goal. You also give a penalty shot for that, not a penalty corner.
What is the circle in field hockey?
In field hockey there are two circles drawn. These circles each have two lines on either side of the target and go 10 to 20 cm deep into the field. The declarant at a penalty corner stands next to the second line seen from the goal and places the ball at the intersection of the back line and the line.
The attacking team can choose whether to indicate from the left or from the right. The two lines are 5 and 10 meters away from the goal posts.
Penalty corner strategy for the attacking side
The attacking side can determine its own strategy, but at least there is a declarant and someone who will try to score the ball. Usually they also use a “stopper” and have several players who can “tip” the ball into goal.
They can line up with as many players as they like around the circle, although most tactics use five players to also have defenders behind.
Penalty corner strategy for the defending side
With four players plus a goalkeeper in the goal behind the back line, the basic strategy has been laid. This is also the maximum number of players that can be bet.
Usually, two defenders will run to the farthest point of the circle once the ball has been played. This is to block the ball there. Furthermore, often one player will cover the declarant, while there is still a defender remaining in the goal. They call this the “line stop”.
The keeper comes a little bit out of his/her goal.
The protection that is chosen is actually determined by the players themselves. Usually masks and sometimes a toque and a pair of gloves. The defenders who do not enter the goal must remain behind the halfway line until the penalty corner is taken.
Where do you stand as a referee at a penalty corner?
As a referee you have a permanent place when a penalty corner is taken.
- One umpire stands at the center line. Here he can see if the defenders stay behind the halfway line before the penalty corner is taken.
- The second referee, who is responsible for everything that happens in the circle, is about 5 to 6 meters from the goal and 1,5 meters from the back line. This way you can see the goal line and the declarant at the same time and you only have to turn sideways as soon as the ball goes to the head of the circle.
Both referees start the penalty corner beforehand with both hands up. If you are at the center line, lower your hand when the defenders are all positioned behind the center line. Then your colleague checks whether the players around the circle are also neatly arranged. Then he also lowers his hand.
Once both referees have lowered their hands, the penalty corner may be taken.
A penalty corner can go very quickly and it is therefore essential to pay close attention as umpires. You really need to have the rules ready and here are some tips:
Rules for taking the penalty corner:
- The ball must lie within the circle on the back line. The distance from the goal post must be at least 10 meters.
- The player taking the penalty corner should actually be outside the field of play. Not with his entire body, but with at least one of his feet outside the lines.
- The other players of the attacking team are inside the field, but must remain outside the circle. No foot, hand or stick may touch the ground within the circle.
- The attacking team may surround the circle with as many players as they wish.
- In order to play the ball, no players other than the one taking the corner must be within 5 meters of the ball at the time of taking.
- A maximum of five defenders, including the goalkeeper, must be behind the back line. They are also not allowed to touch the field with their hands, feet or stick.
- The rest of the defending team must be on the opposite side of the halfway line.
- Each player must maintain this position until the ball is played at the penalty corner.
- To prevent play to himself, the person who took it must not touch the ball or come within playing distance of it until it has touched another player.
- The penalty corner rules only expire when the ball has been at least 5 meters outside the circle.
Rules about scoring on a penalty corner:
- You may not score until the ball has gone out of the circle.
- When the first shot at goal is a strike, not a push, scoop or flick, the ball must cross the goal line at less than 460mm for a valid goal to be scored. 460 mm is the height of the rear shelf. The ball can of course be deflected before it crosses the goal line and it can still be a valid goal. This involves checking if he was on a road that, before being changed direction, would have validly entered the target from below 460mm.
- There are no height restrictions for second and subsequent shots on target and for shots with flick, tip-in and scoop, provided they are of course not dangerous.
Important tips for the referee at a penalty corner:
- When the penalty corner is taken, the teams are not allowed to change players. It is of course possible that an injury has occurred during the incident. Only when this is the case with a keeper can he be substituted, other injured players are not allowed to.
- The attacking team has the choice to take the penalty corner from the left or right side.
- It is best to stand a little bit in front of the back line yourself. In the circle with the target on your right. This way you can see both the defenders and the attackers well. Try to avoid attackers standing behind your back to keep the overview.
- Make sure that attackers stay outside the circle with their feet and hockey stick. Also on the line is not allowed. This most often happens, that they secretly want to go just a little earlier than the ball is taken.
- Only start the game again when all players are lined up correctly. Just hold your hand up until it reaches this point so that the penalty corner cannot be taken until everyone is in the correct position. When the players have found the right spot, you can lower your hand. This way the player at the ball knows that he/she can take the corner.
- If one of the players has made a mistake, for example if the player with the ball is not out of bounds with at least one shoe, the penalty corner will have to be taken again. It doesn't matter how many times people make a mistake. It will then have to be repeated over and over until a correct corner is taken.
- You may not feint when taking the ball. This could provoke a foul by a defender just to take another penalty corner with one defender less. Instead, you punish the attacker by sending him to the other side of the center line. Now another attacker will have to take the penalty corner.
- Defenders also often run too early and are only allowed when the ball has been taken. Stop the game and let the corner take again. That defender must now leave the corner and return to the halfway line so that the defending side will have to fight with one less defender. An exceptional situation arises when the keeper runs out too early. The goalkeeper is needed in any case, so now the defending side gets to choose a defender who will have to move to the other side of the halfway line. The only reason not to blow the whistle here is when it would be against the attacking team, such as with a real scoring chance.
- It is possible that a penalty corner is awarded, while the game is immediately over. In that case, call off the match. The other attacking players can now report to the edge of the circle, after all, their game is over. Now this last away penalty corner is completed, after which the game is over.
- This play-out penalty corner can of course also result in a new penalty corner. The game ends with a goal, knockout, long corner, if the ball has been 5 meters outside the circle, if an offense has been committed that does not result in a new penalty corner or if the ball is played outside the circle for the second time. A new penalty corner is therefore played again, even though the time is up.
- It doesn't happen often, at least not with experienced players, but it can happen that the ball is played too softly. This in itself is not a problem, but make sure that the player who took the ball does not take it again. This is called a self-pass and is not allowed.
When do you concede a goal as a referee?
- The ball must have been outside the circle.
- He must then have been correctly played with the stick within the circle by an attacker. He may also have been touched by a defender.
- The first shot at target must always have been played at plank level. However, he may be changed direction by another player, so that he may still get higher on goal. A defender can hit the ball in any way and it still counts as a goal. If an attacker touches the ball, he must have played the ball correctly. For example, hitting with the convex side is not an issue, when the defense does this, it is.
- Another handy tip: if the ball has not been outside the circle and the goal is still being shot, then in principle you do not have to whistle. The goal would not have been valid, but whistle only when the ball enters the goal. If the keeper stops the ball, you can let the game continue.
- If the ball has been outside the circle, you can whistle for a violation. For example, when the first shot has been too high and is stopped by the goalkeeper; then you whistle.
- Some situations are dangerous for a defender, but let you continue anyway. For example a second shot that is played high, or also a hard push. When the defender is in the line of the ball, such as on the goal line, he may need to take relief. Yet this is just a goal. Only when a defender has to give way to a high shot within 5 meters of playing distance in the circle, you whistle for an offensive foul. Here too, nuances can be found, such as whether the attacker has taken sufficient account of the defense and has chosen a clear path to shoot.
- If a defender is hit below his knee, you give another penalty corner. Is it on purpose then maybe even a penalty shot. If the defender is hit higher than the knee, then it is again an offensive violation. Unless the ball goes up because a defender hit it, of course.
- Another specific situation is indirectly holding off. Attackers could hinder a defender when running in. So always pay attention to the attackers who are not on the ball. A player must never prevent another from reaching the ball.
Short video penalty corner
The video below shows briefly that it is sometimes difficult for a referee to see when a ball has been outside the circle while taking a penalty corner. The video shows a correctly executed staff corner, but the ball moves at lightning speed and you have to hold the right angle to see it properly.
Running lines for the referee
- Handle the hockey stick line. This one is easy to remember and immediately gives you the perfect running line as a referee. You have primary responsibility for your own half of the field. However, you may whistle over the entire field. It is customary to keep the diagonal, but it is best to discuss this beforehand with your fellow referee.
- You bear full responsibility for your own circle. That includes backline plus sideline.
- It is by no means convenient to whistle in the circle of the other. Never do this, but only help if your colleague explicitly asks for it.
- Where is your position in the field: make sure you have the right walking line in the first place. The standard hockey stick line is the ideal method for this. When the other half is played, you move about 5 to 10 meters along the sideline to the 23 meter line.
- When the ball reaches your own 23 meter line and play continues towards the goal, then bend towards the 2nd line on the back line.
- Always stay ahead of the attack. As soon as the attack comes to your side, you already move backwards. This way you have a better overview of what is going on. You can keep doing this far back in the field. The hockey stick line only bends into the circle, not before that.
Below is a picture of the hockey stick line that you can follow as a referee in most cases:

(Source: KNHB.nl)
Hire a referee for a hockey game
When you've got your card, and maybe even your CS+ certificate, then clubs are definitely looking for you. Sometimes as a replacement for a sick or injured referee, or perhaps as a permanent substitute.
There are several ways to be found for those looking for a hockey referee.
The most traditional way is of course word of mouth. A lot of arbitrators are exchanged in this way, especially regionally. The association in a village or town further on is shy and know where to find you.
It's good to network once in a while when you're somewhere to keep these contacts warm. This also applies the other way around! When you make nice contact with players, parents and other referees, you can also address them when you need something.
Other methods are available these days with everything online. This way you can increase your reach and reach more potential candidates.
For example, there is the online marketplace for referees:
If you want to hire one temporarily, you can easily visit the site and you can often arrange one within a day. Still beautiful, such a lifesaver!

