I enjoy writing these articles for my readers, you guys. I don't accept payment for writing reviews, my opinion on products is my own, but if you find my recommendations helpful and you end up buying something through one of the links I may be able to receive a commission on that. More information
Learning how to accurately throw a football is actually one of the HARDEST parts of the sport. So it's good to pause for a moment.
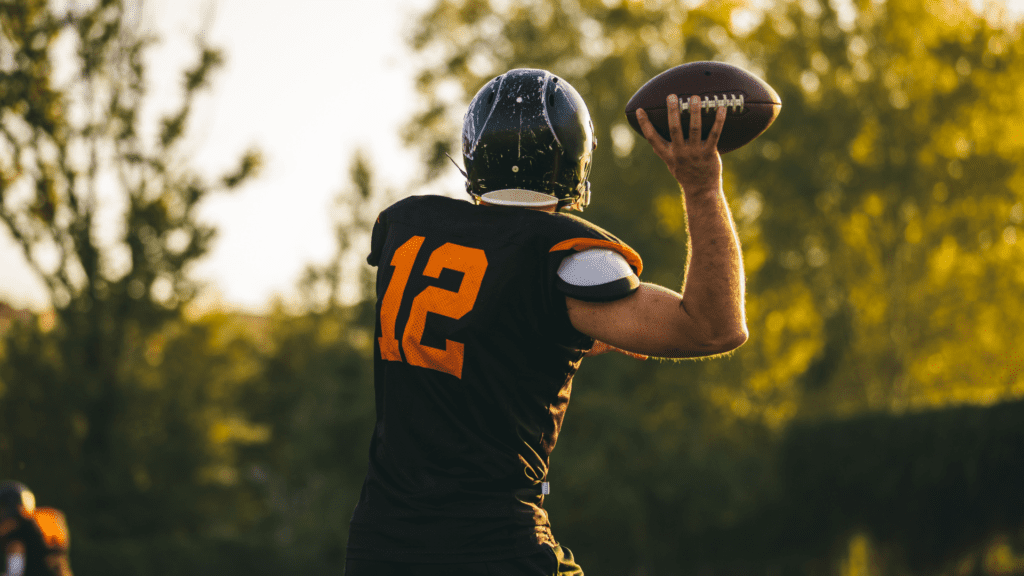
The secret of throwing one American Football lies in the correct placement of the hands and fingers, the movement of the body, and following the arm movement, even after you have ball have released. You throw the perfect spiral by making a powerful and controlled movement.
In this article you can read exactly how to an American football (best rated here) throws.
What we discuss in this comprehensive post:
Step by step guide to throwing an American football
I've put together a step-by-step guide that will help even the most inexperienced player, or perhaps coach, throw that perfect ball.
Remember: It takes time to learn how to throw a football, so don't get discouraged if you flop the first time. It is a process of trial and error.
Placement of the hands
Before you can even throw a ball, you need to know how to place your hands.
Pick up the ball and twist the laces so that they are at the top. Hold the ball with your dominant hand and place your thumb under the ball and two, three or four fingers on the laces.
Bring your index finger near or directly to the tip of the ball.
Grab the ball with your fingers. Bend your fingers so that your knuckles lift slightly from the ball.
How many fingers you put on the laces is a matter of personal preference. There are quarterbacks who put two fingers on the laces and others who prefer to use three or four fingers.
Your index finger should form an almost right triangle with your thumb. Use your fingers and the laces to get grip and control over the ball.
So decide for yourself what you find comfortable when holding the football.
It also depends on the size of your hand. For example, someone with a smaller hand will not be able to grab the ball in the same way as someone with a larger hand.
Try out different grips in advance, so that at a given moment you know exactly what works best for you.
To glove or not to glove? Read here all about the benefits of American football gloves and which are the best
The movement
Once you've found the perfect grip, it's time to understand how to move your body. Below you will learn step by step how to make the perfect throwing motion:
Make sure your shoulders are aligned – and perpendicular – to the target. Your non-throwing shoulder faces the target.
- Place your feet shoulder-width apart, with your knees slightly bent.
- Hold the ball with both hands, with the fingers of your dominant hand on the laces.
- Now take a step with the foot opposite to your throwing arm.
- Bring the ball, which should be pointing up, behind your head, still with the laces on top.
- You hold the other arm in front of you.
- Throw the ball forward past your head and release it at the highest point of your arm movement.
- When releasing, bring your wrist down and continue to follow the movement with your arm.
- Finally, follow the movement forward with your back leg.
To start, you should be facing the target with your non-throwing shoulder. When throwing, lift the ball above your shoulder.
This height allows you to throw the ball quickly when needed.
Keeping your arm too low will restrict your range of motion and make it easier for defenders to intercept the ball.
Your weight should start on your back leg – so on your right leg if you throw with your right arm or your left leg if you throw with your left arm.
Then, shift your weight from your back leg to your front leg, taking a step with your front leg in the direction you want to throw the ball.
At the same time, you should start the throwing motion of your upper body.
Don't stop the movement of your arm as soon as you release the ball. Instead, your arm should continue in a downward path toward the hip of your front leg.
Your back leg should follow your body forward so that you end up with both legs in an equal position parallel to each other.
Moving your wrist as if you were throwing a basketball will create a precise spiral effect. Your index finger is the last finger to touch the ball.
Your exact release point will keep changing depending on how far you throw the ball.
For example, shorter passes require a release point closer to your ear and a greater follow to get enough speed.
Long, deep passes, on the other hand, are usually released further back behind the head to make an arc and get the distance needed.
When you're learning how to throw a football, I don't recommend doing a sideways move. This is bad for the shoulder and also a less accurate throwing technique.
Extra tip: Do you find it difficult to remember the movement? Then consider a golf swing.
It wouldn't make sense to stop the golf club movement by the ball. You want to get the full swing, and get the full momentum.
How do I get the perfect spiral?
Throwing the perfect spiral is all about the follow-through.
When you throw the ball, make sure you don't stop the arm movement when you release the ball.
Instead, do a full swing. When you release the ball, make sure to flick your wrist down.
The last finger that has contact with the ball is your index finger. The combination of these two movements creates the spiral effect of the ball.
However, it is important to understand that no matter how many times you practice, not every throw will be perfect. Learning how to throw a spiral takes time.
Why is a spiral throw so important?
A spiral – where the ball spins in perfect shape – ensures that the ball cuts through the wind and arrives at its destination as quickly and accurately as possible.
Throwing a spiral is similar to how a football player kicks a ball, a golfer hits a ball, or a pitcher throws a baseball.
Holding the ball in a certain way allows you to manipulate it in just the right way so that when released, the result is predictable.
Throwing a spiral is not only important to be able to throw a ball harder and further, but also to be able to throw a predictable ball for the intended recipient.
This means that it is easier for the receiver to predict where the ball will land and know exactly where to run to catch the ball.
Balls that are not thrown in a spiral can spin or spin with the wind, and often do not go in a straight arc…
If the receivers cannot predict where the ball will go, it will be nearly impossible for them to catch the ball.
Here are two quarterback drills to get you on the right track.
One-knee and two-knee drill
The main purpose of the one knee drill is to focus on the fundamental techniques of throwing a football.
Doing the exercise on one knee allows you to better focus on your grip, body position and release of the ball.
For this drill, or exercise, you need two players.
Because this exercise is all about technique, not throwing distance or throwing speed, the players can be placed close together, about 10 to 15 meters apart.
The two players must toss the ball back and forth while remaining on one knee. In this exercise, pay extra attention to the technique of throwing a ball.
You can also try out different grabs and release techniques so that you understand what feels right for you.
After about 10 tosses back and forth, both players switch knees.
Tip: Move your upper body back and forth as you throw the ball to mimic the movement you will experience during the game.
This will help you better prepare for passing while running or dodging opponents.
The two-knee drill works the same, except that the players are on the ground with two knees.
How to throw an American football further?
If you want to learn how to throw a football farther, perfecting your technique is the best place to start.
Repeat my step-by-step guide to understand what feels best for you: the grip, your body position and how/when you release the ball.
By consistently using the same technique, you'll build the torso and arm strength you need to throw at a greater distance.
Practice throwing while moving - both walking and running. As you build momentum, more kinetic energy flows into the ball, resulting in a longer throw.
And even though you may be limited in your movements during a match, you should always try to 'step' into a throw (ie take a step with the foot opposite to your throwing arm).
Practice makes perfect. Before the season starts, make sure you know and practice all the routes from the playbook to build strength for different field positions.
If you mainly want to build the distance of your throw, focus on practicing 'fly' routes.
Protect your arms during the game with the best arm protection for American football

